Surface topography measurement: 2D profile measurements
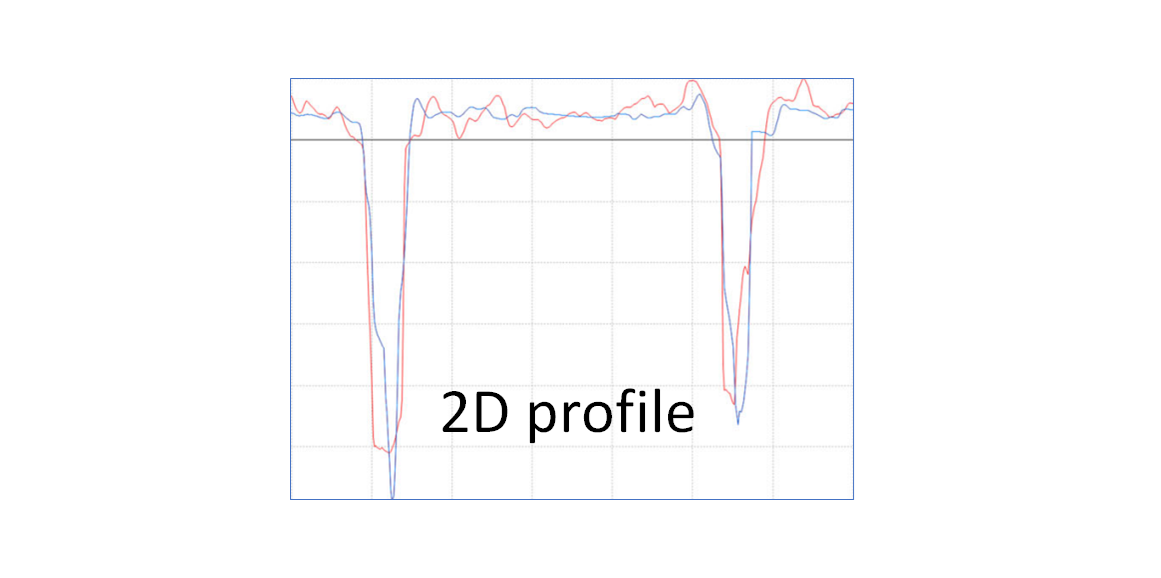
This post discusses the procedure to perform a reliable 2D profile measurement and analysis.
This post discusses the procedure to perform a reliable 2D profile measurement and analysis.
For surface texture analysis, there are three fundamental steps to perform 2D profile or 3D areal surface texture measurements: fitting, filtering and analysis.
Fitting process is to remove form components (form removal) from surface data points captured by a surface texture measuring instrument (either tactile/contact or optical/non-contact instrument). This process essentially removes the very low frequency component of the surface data, that is, the form (for example, tilted or curved surfaces).
Filtering process is to extract high-frequency components from the surface data and to get roughness, waviness or primary components (high or low spatial frequency components) for further analysis. There is a quite significant difference between filtering process for 2D profile and 3D areal data. 3D areal data filtering will be discussed in more details in the next post.
Analysis process is to calculate 2D profile or 3D areal parameters from the filtered surface data. specifically for 3D areal parameters, we calculate these parameters on a scale-limited surface (after a sequential filtering process).
It is important to note that, different procedures or set values on one or more of the three fundamental steps, we will get a noticeable different in calculated surface texture parameters [1].
Hence, we need to make sure that we follow the three fundamental steps according to established standards so that our calculated 2D profile or 3D areal surface texture parameters are reliable and comparable.
READ MORE: Surface topography measurement: Why do we need to measure surfaces?
Fitting: form removal from captured 2D profile data
Fitting is the way to remove the form components from a captured 2D profile. This process is always the first step for surface texture measurement for both 2D profile and 3D areal.
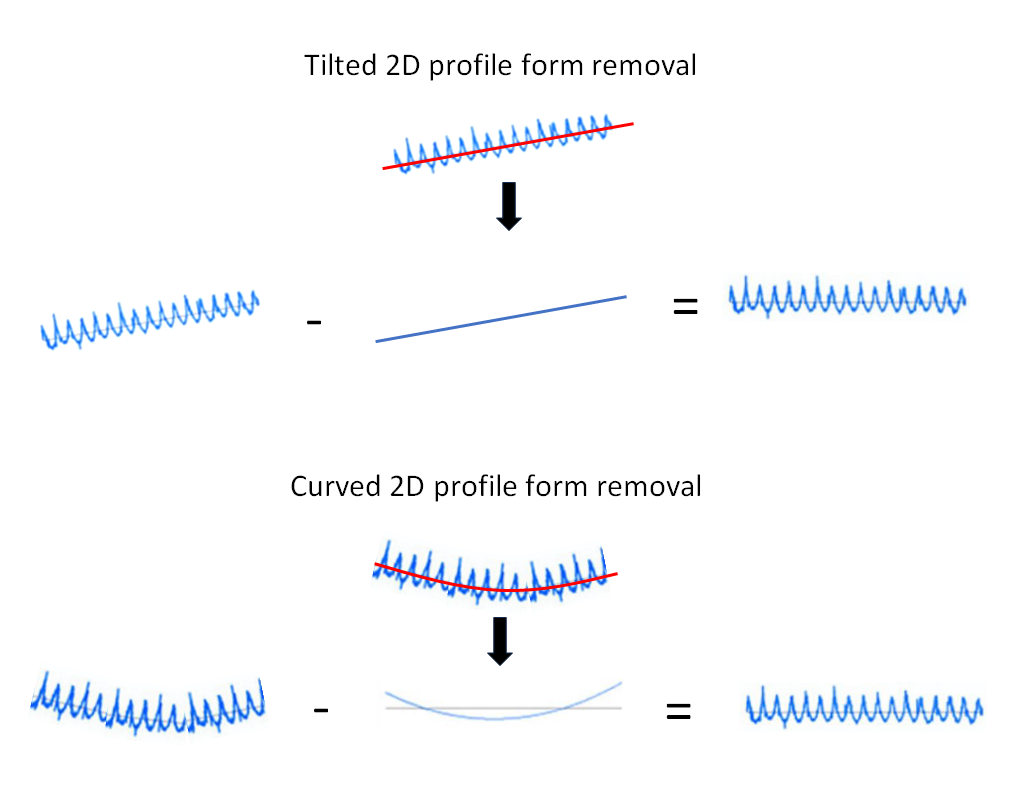
The form to removes are typically, but not limited to, tilted or curved 2D profile data or even complex free-form profile. Figure 1 below shows example illustrations of form removal for tilted or curved 2D profile data.
In figure 1, the algorithm to remove the form are Gaussian fitting, preferably a robust Gaussian fitting to so that outliers will not affect the form removal process.
After the form removal process, we will get residuals from the 2D profile data. These residuals will relatively be flat.
READ MORE: The fundamental concept of metrology
Filtering: Extracting the roughness components from form removed 2D profile
From a form removed 2D profile data, we must apply filtering on the data to extract roughness components (high frequency components) from the data or other components, such as waviness or primary data.
This process will separate waviness components (longer wavelength) and roughness (shorter wavelength).
Figure 2 shows the three steps of 2D profile analysis, including fitting, filtering and analysis. specifically, in Figure 2, the filtering processes are given in details.
We apply filtering to get primary, waviness and roughness profiles. Form each profile, we can calculate parameters depending on our needs.
There are two types of cut-offs variables for the filter: $\lambda _{s}$ and $\lambda _{c}$.
$\lambda _{s}$ is the cut-off for high-pass filter used to obtain a primary profile. Meanwhile, $\lambda _{c}$ is the cut-off for low-pass filter (to obtained waviness profile) and high-pass filter (to obtain roughness profile).
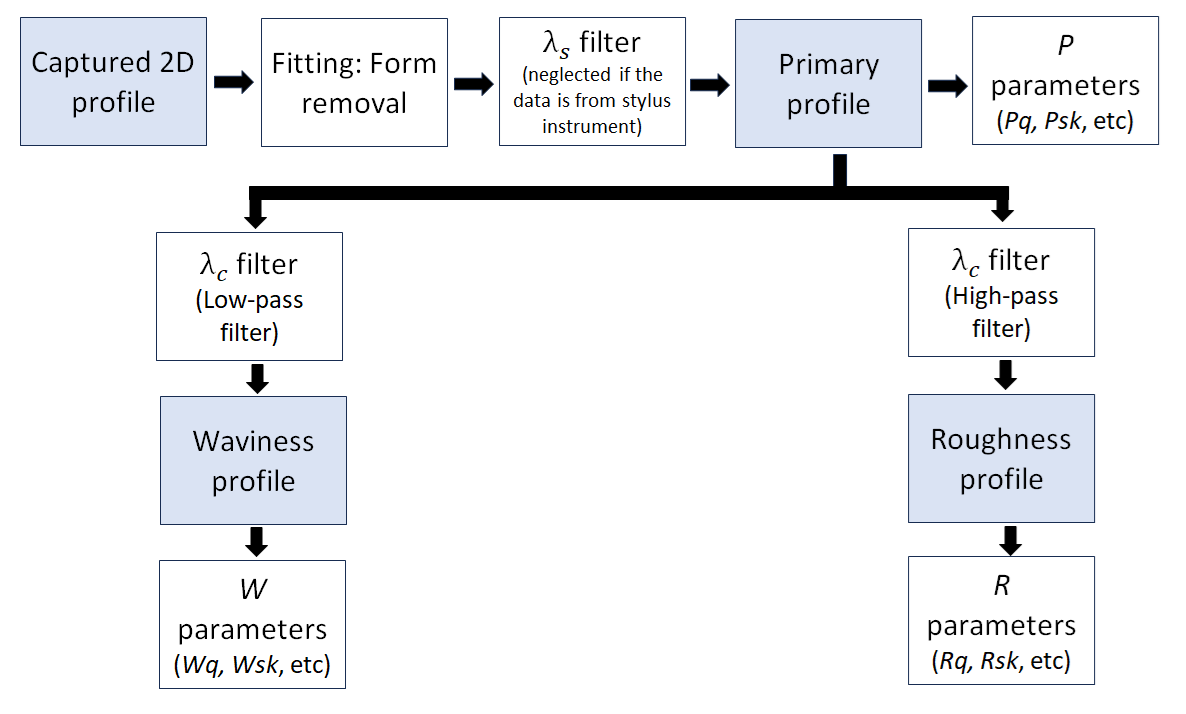
If the form removed 2D profile is measured by using a tactile (stylus) instrument, hence the profile is automatically a primary data and a filtering process with $\lambda _{s}$ cut off is not needed. Otherwise, a low pass filtering (commonly using $\lambda _{s}=2.5 \mu m$) or morphological filtering can be applied to the captured 2D profile to get the primary data.
The filtering process through the primary and form-removed 2D profile involves a “smoothing process” across the data.
We need to define the cut-off value of the filter. This cut-off value represents the degree of smoothing the filter will perform.
The selection of this cut-off $\lambda _{c}$ value is critical, and we must follow a standardises value.
The cut-off value defined the wavelength where the filter attenuates the amplitude by 50%.
ISO21920:2021 part 3 provides guide to select the cut-off value [2]. This standard replaces the well-known ISO4288: 1996 standard.
A common practical rule for the cut-off value is one-fifth of the evaluation length of 2D profile data.
Typical cut-off $\lambda _{c}$ values are 0.08mm (for 0.4mm evaluation length), 0.8mm (for 4mm evaluation length) and 0.25mm (for 1.25mm evaluation length) [2].
Figure 3 shows filter transmission characteristics for various cut-off length, specifically $\lambda _{s}$ and $\lambda _{c}$.
From Figure 3, we want high frequency components to obtained roughness profile and low frequency components to obtained waviness.
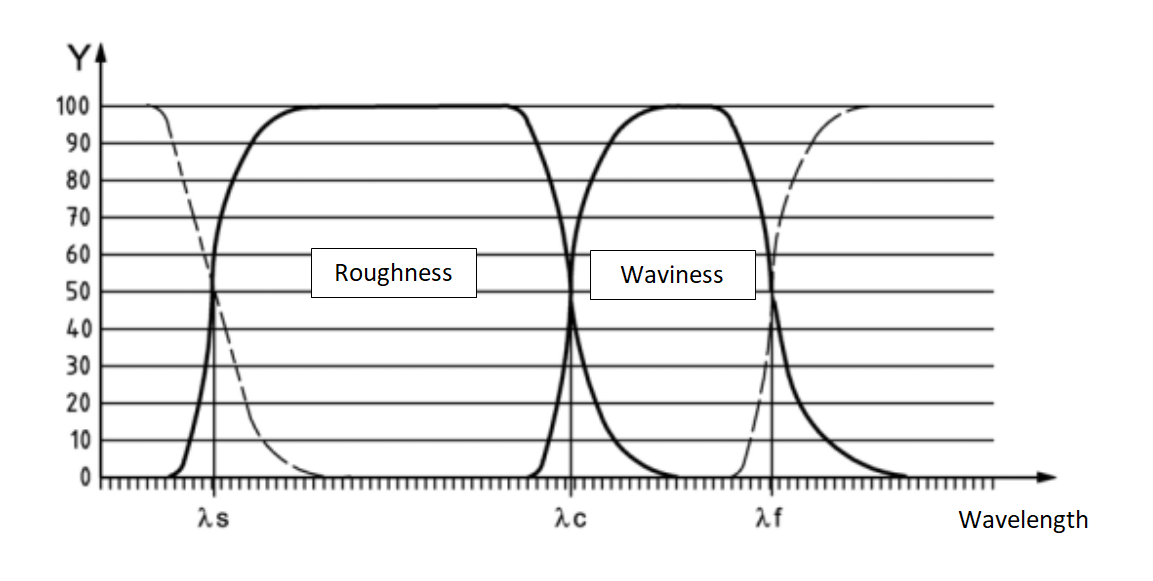
Figure 4 below shows examples of obtained waviness and roughness profile after filtering a primary profile with low-pass and high-pass filter (respectively) with the same cut off $\lambda _{c}$.
From figure 4, we can observe that waviness has a longer wavelength. Meanwhile, roughness shas short wavelength. Varying the value will vary the waviness and roughness profile and hence their calculated parameters!

ISO16610 series provides guides for various filtering process of 2D profile data as follows:
- ISO16610-21: Linear Gaussian filter.
- ISO16610-22: Cubic Spline filter.
- ISO16610-29: Wavelets filter.
- ISO16610-31: Robust Gaussian filter.
- ISO16610-32: Robust Spline filter.
- ISO16610-41: Morphological filter.
- ISO16610-49: Multiscale filter.
These various filters serve their own specific purposes depending on application specifications. We need to make sure we know what filter to use. The most common used filters are Linear Gaussian and Robust Gaussian filter.
These two filters serve most of 2D profile analysis needs.
READ MORE: Five reasons why measurement uncertainty is important
Analysis: calculating 2D profile roughness parameters
After getting the profile we want either primary, waviness or most likely roughness profile, we can apply parameter calculations from these data.
There are various 2D profile parameters we can calculate to represent the conditions of our profiles.
By quantifying the condition of the profile, we can relate the calculated parameters to our processes or our product functionalities.
ISO21920:2021 part 2 provides guide to various 2D profile roughness parameter calculations including the parameter mathematical formulas. [3]. This standard replaces the well-known ISO4287: 1997 standard.
Common 2D profile parameters are as follows [3,4]:
- Amplitude parameters: Maximum height (Rz), maximum profile peak height (Rp), maximum profile valley depth (Rv), mean height (Rc), Total height (Rt).
- Amplitude average parameters: Arithmetic mean deviation (Ra), root mean square deviation (Rq), Skewness (Rsk), Kurtosis (Rku).
- Spacing parameters: mean width (Rsm).
- Hybrid parameters: Root mean square slope (Rdq).
- Material ratio curve and related parameters: Material ratio (Rmr-c), profile section height difference (Rdc), relative material ratio (Rmr).
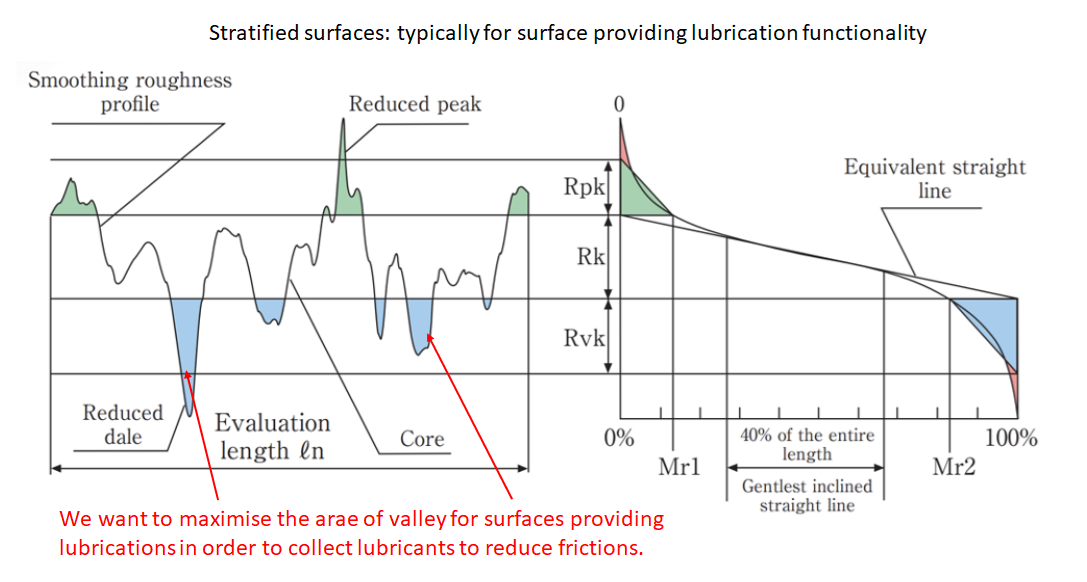
- Parameters for surface with stratified functional properties: Core roughness depth (Rk), reduced peak height (Rpk), reduced valley height (Rvk), material portion (Mr1 and Mr2).
Ra and Rq are the two most common profile roughness parameters as they quantified general roughness conditions of a surface.
However, these parameters cannot represent a specific condition and may need to be accompanied by other parameters for us to uniquely describe a surface roughness condition.
Specifically for friction and lubrication surfaces, parameters for surface with stratified functional properties (Rk, Rpk, Rvk, Mr1, Mr2) are typically used to describe the texture of frictional or lubricating surface, for example the surface of an engine cylinder block.
Figure 5 below shows the illustration of stratified surfaces designed to provide lubrication functionality, for example the surface of an engine cylinder block. Ideally, we want to maximise the Rvk value which means we maximise the valley area.
The valley area will collect lubricants. These lubricants will stay on the valley area reduce frictions.
READ MORE: Five reasons why measurement uncertainty is important
Conclusion
In this post, we have discussed the three essential steps for 2D profile roughness parameter analysis. these three steps are fitting, filtering and analysis.
Fitting is to remove form from 2D profile data. filtering is to extract roughness (or waviness and primary data) data from form-removed 2D profile data. Finally, we can calculate various roughness parameters from filtered data.
We must note that we should follow these standardised procedures, including values used on each procedure, so that we can reliably compared calculated roughness parameters. Because a slightly different in procedure and values used on each procedure will cause a significant difference on calculated roughness.
Reference
[1] Leach, R. ed., 2013. Characterisation of areal surface texture. Berlin: Springer.
[2] ISO 21920-3:2021 Geometrical product specifications (GPS) — Surface texture: Profile Part 3: Specification operators
[3] ISO 21920-2:2021 Geometrical product specifications (GPS) Surface texture: Profile; Part 2:Terms, definitions and surface texture parameters
[4] ISO 4287:1997 Geometrical Product Specifications (GPS) — Surface texture: Profile method — Terms, definitions and surface texture parameters
[5] Olympus. 2017. Introduction to Surface Roughness Measurement. Roughness measurement guidebook.
You may find some interesting items by shopping here.
